37歳おっさんが英語×プログラミングで転職できるのか検証中です。
セブの『Kredo』さんという学校でPythonとAI(人工知能)を学習しています。
今回の記事は、第2週2日目の記録です。
▼もくじ
授業内容
- import
- moduls & files
- numpy
- package
- library
- reader
- witer
- with open
- Flask
ざっとこんな感じです。
来週フィリピンの祝日の関係で二日間お休みなので、なんともうFlaskに入りました・・・(笑)
つまり、二週目の内容は全て終わりました。
水木金と3週目の内容に移ります・・・ぬぉぉぉ
まだ予習していないので急いで予習します!!
ピーンチ!
Pythonを使ってウェブページに反映
とうとうPythonのコードを使って、HTMLやBootsrapと組み合わせて、ウェブページに表記するやり方を学び始めました。
今までは下知識があったので楽勝でしたが、知識がないと授業のペースが速く感じました。
まぁ、どうにか付いて行っています。
Pythonのコード
from flask import Flask, render_template
#create instance
app = Flask(__name__)
@app.route(“/”)
def hello_world():
return “Hello Wolrd!”
@app.route(“/goodbye”)
def goodbye():
return “Goodbye!”
@app.route(“/html”)
def index():
name = “John Doe”
age = 10
country = “Philippines”
return render_template(‘index.html’, myName=name, myAge=age, myCountry=country)
@app.route(“/bootstrap”)
def bootstrap():
cal_6 = “This is cal col 6”
cal_6_2 = “This is another col 6”
return render_template(‘bootstrap.html’)
if __name__ == ‘__main__’:
app.run()
HTMLコード
<!DOCTYPE html>
<html lang=“en”>
<head>
<meta charset=“UTF-8”>
<meta name=“viewport” content=“width=device-width, initial-scale=1.0”>
<meta http-equiv=“X-UA-Compatible” content=“ie=edge”>
<title>Document</title>
</head>
<body>
<h1>Hello World</h1>
<h2>I’m {{myName}}</h2>
<p>I’m {{myAge}} years old, I live in {{myCountry}}</p>
</body>
</html>
Bootsrapコード
<!doctype html>
<html lang=“en”>
<head>
<title>Title</title>
<!– Required meta tags –>
<meta charset=“utf-8”>
<meta name=“viewport” content=“width=device-width, initial-scale=1, shrink-to-fit=no”>
<!– Bootstrap CSS –>
<link rel=“stylesheet” href=“https://stackpath.bootstrapcdn.com/bootstrap/4.3.1/css/bootstrap.min.css” integrity=“sha384-ggOyR0iXCbMQv3Xipma34MD+dH/1fQ784/j6cY/iJTQUOhcWr7x9JvoRxT2MZw1T” crossorigin=“anonymous”>
</head>
<body>
<div class=“row”>
<div class=“col-6”>
{{Cal6}}This is col 6
</div>
<div class=“col-6”>
This is another col 6
</div>
</div>
<!– Optional JavaScript –>
<!– jQuery first, then Popper.js, then Bootstrap JS –>
<script src=“https://code.jquery.com/jquery-3.3.1.slim.min.js” integrity=“sha384-q8i/X+965DzO0rT7abK41JStQIAqVgRVzpbzo5smXKp4YfRvH+8abtTE1Pi6jizo” crossorigin=“anonymous”></script>
<script src=“https://cdnjs.cloudflare.com/ajax/libs/popper.js/1.14.7/umd/popper.min.js” integrity=“sha384-UO2eT0CpHqdSJQ6hJty5KVphtPhzWj9WO1clHTMGa3JDZwrnQq4sF86dIHNDz0W1” crossorigin=“anonymous”></script>
<script src=“https://stackpath.bootstrapcdn.com/bootstrap/4.3.1/js/bootstrap.min.js” integrity=“sha384-JjSmVgyd0p3pXB1rRibZUAYoIIy6OrQ6VrjIEaFf/nJGzIxFDsf4x0xIM+B07jRM” crossorigin=“anonymous”></script>
</body>
</html>
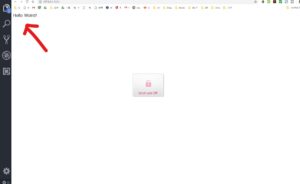
上記でHello Worldがブラウザで表示される
上記のコードでこんな感じに、文字を表示させることができました。
HTMLだけだと簡単にブラウザで文字を表示させることはできるのですが、Pythonでコードを組んでから表示させる方法は初めてです。
勉強になりました。

Visual Studio Codeの便利な拡張機能

VS Codeって、色々とExtentions(拡張機能)がありますよね。
先生がちょくちょく教えてくれるので、シェアしておきます。
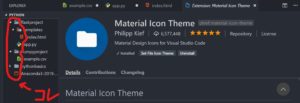
この『Material Icon Theme』を入れておくと、ファイルの種類ごとにアイコンが変わるので、見た目でファイルが判断しやすくなります。
作業効率が上がりますね。
かなりおすすめです。
Ptyhon & AI学習まとめ
KredoのAIコースやプログラミング学習について、以下の記事に全てまとめてあります。
ぜひお立ち寄りください(^^)/
https://xn--4gr220a2sk1qvzyi.jp/programming-at-37/


